
A curved wall exposes cutting mistakes that a flat backsplash can hide. Even a difference of a few millimeters can turn an otherwise smooth mosaic into a jagged-looking joint, especially when sunlight catches the glass from the side.
Learning how to cut small glass mosaic tiles for outdoor curved walls therefore involves more than making smaller pieces. You need to control the shape of each cut, protect fragile glass edges, maintain consistent grout lines, and account for the temperature and moisture changes an exterior installation will experience.
The most reliable approach is surprisingly simple: use the curve to determine the tile size, make rough adjustments with wheeled mosaic nippers, reserve diamond cutting tools for precision work, and dry-fit repeatedly before mortar touches the wall.
Why Curved Walls Change the Cutting Strategy
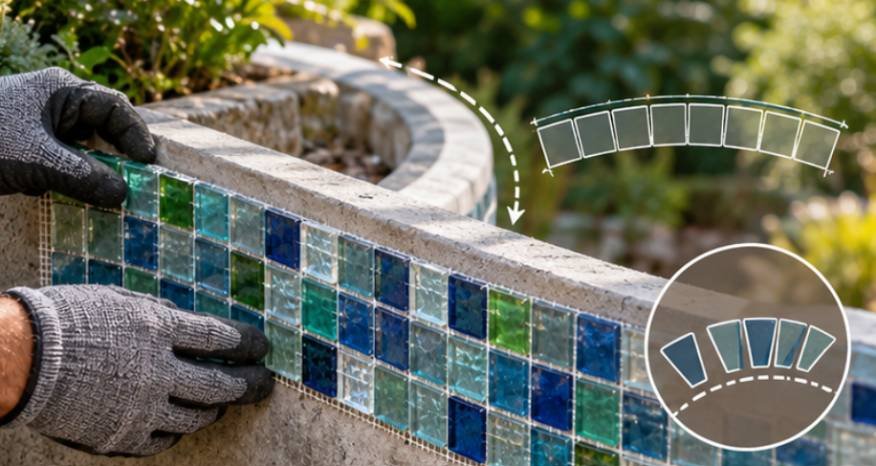
Glass mosaic sheets naturally tolerate slight curves because the individual tesserae are separated by grout joints. The tighter the radius becomes, however, the more difficult it is for a full sheet to lie against the substrate without opening joints on one side or compressing them on the other.
That means the first decision is not which saw to buy. It is whether the sheet should remain intact.
For a gentle radius, cutting the mesh backing between rows may provide enough flexibility. On a tighter curve, dividing the sheet into narrower strips or installing individual pieces usually produces a cleaner result.
For a related curved tiling challenge, see how to tile around an outdoor pizza oven arched opening while planning tile cuts and fitting around a curved opening.
Try placing an uninstalled sheet against the wall first. If it sits naturally against the surface while maintaining reasonably consistent joints, extensive tile cutting may be unnecessary. If the sheet bridges the curve or neighboring rows begin spreading apart, divide it into smaller sections.
This simple dry-fit test prevents a common mistake: forcing rigid sheets around a radius and trying to correct the resulting joint problems with grout.
Choose the Cutting Tool Based on the Cut
No single tool is ideal for every glass mosaic adjustment.
Wheeled Mosaic Nippers for Tiny Corrections
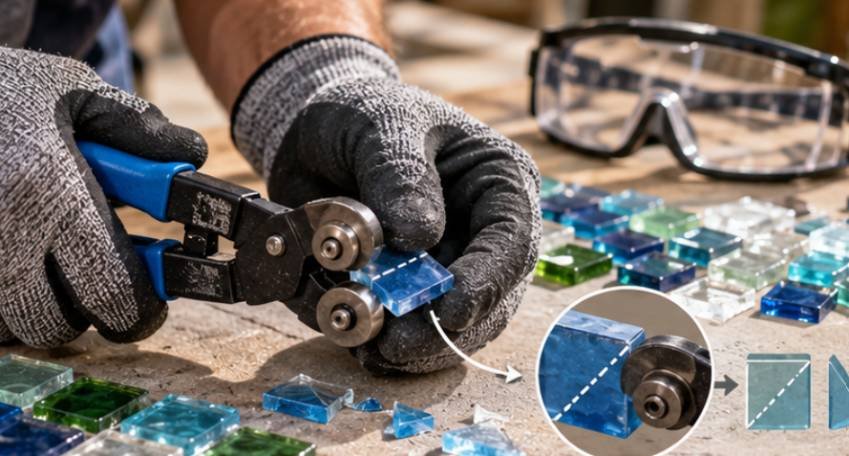
Twin-wheel glass mosaic nippers are usually the fastest choice for shortening tiny pieces, removing corners, or creating a slightly rounded edge.
Unlike ordinary tile nippers, the carbide wheels apply concentrated pressure to the glass. Instead of attempting one aggressive bite, remove small amounts progressively.
This technique is particularly useful around curved boundaries because the finished edge can be developed gradually rather than attempting to reproduce a curve with one cut.
Wear proper eye protection while nipping glass. OSHA identifies grinding and similar operations involving flying particles as activities requiring suitable eye and face protection.
Diamond Wet Saw for Straight, Repeatable Cuts
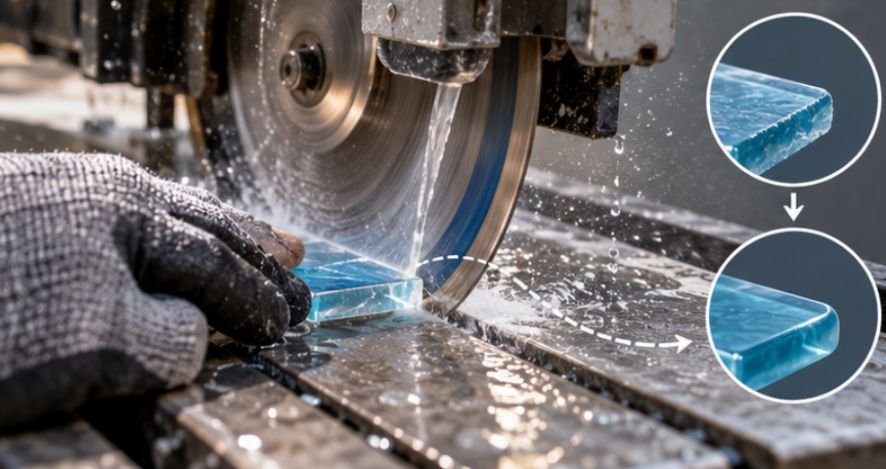
A wet saw fitted with a blade approved for glass is better when several pieces need identical straight edges. Feed glass slowly and steadily. Pushing harder rarely produces a faster, better cut; it increases vibration and can worsen edge chipping.
Small mosaics can also shift while approaching the blade. Supporting them on a scrap tile, appropriate cutting jig, or another stable surface can make the cut easier to control. Never hold tiny pieces dangerously close to a moving blade.
Wet cutting also has an important jobsite benefit when cementitious materials are involved. NIOSH explains that water-spray cutting methods can suppress airborne dust produced during cutting operations.
Rotary Diamond Tool for Difficult Shapes
A rotary tool with an appropriate diamond wheel can help refine notches or unusual shapes that are awkward on a wet saw.
Use it for controlled trimming rather than trying to carve deeply through a tiny tile in one pass. Stabilize the piece, work gradually, and follow the tool manufacturer’s wet- or dry-use instructions.
For any glass fabrication, protecting your hands matters as much as protecting your eyes. The National Glass Association emphasizes appropriate PPE, including cut-resistant hand protection, when working around glass edges.
A Reliable Cutting Process for a Curved Outdoor Wall
The safest way to learn how to cut small glass mosaic tiles for outdoor curved walls is to treat fitting and cutting as one continuous process.
1. Map the Curve Before Cutting Anything
Hold several rows against the substrate and identify exactly where the mosaic stops following the radius naturally.
Mark reference lines on the wall rather than relying only on measurements. Curved masonry and concrete surfaces are rarely perfectly uniform from top to bottom. Check several elevations because the radius may change.
2. Reduce the Sheet Size First
Before cutting individual pieces, cut the mesh between tile rows. Try two- or three-tile-wide strips against the curve. Frequently, narrower strips solve the fitting problem without sacrificing any glass. For particularly tight radii, separate individual tesserae.
3. Mark Every Required Cut
Use a fine marker that remains visible while handling or wet cutting. Whenever possible, position cut edges at transitions, corners, terminations, or areas where they will be less visually prominent.
Do not automatically assume every piece needs the same dimensions. A slightly irregular curved wall may require individually fitted cuts.
4. Make the Largest Cut First
If a significant amount of glass must be removed, use the appropriate diamond blade for the primary cut. Leave yourself a fraction of material for refinement instead of trying to achieve the final contour immediately.
5. Shape the Edge Gradually
Use wheeled nippers to remove tiny sections until the piece follows the required profile.
For a convex curve, several small straight adjustments can visually create a smooth radius once grout fills the spaces between the tesserae.
This is usually more controllable than trying to cut an extremely precise curved edge into a 1-inch mosaic.
6. Ease Sharp Edges
Freshly cut glass can remain razor sharp even when the cut looks clean. Lightly ease exposed edges using a suitable diamond hand pad, rubbing stone intended for glass, or compatible abrasive recommended by the tile manufacturer. You are not trying to reshape the tile; the goal is simply to remove dangerous sharpness.
7. Dry-Fit the Entire Section
Place the pieces back on the wall before mixing mortar.
Look at the installation from several feet away. Uniform grout spacing matters more visually than making every cut mathematically identical.
The Outdoor Part Cannot Be an Afterthought
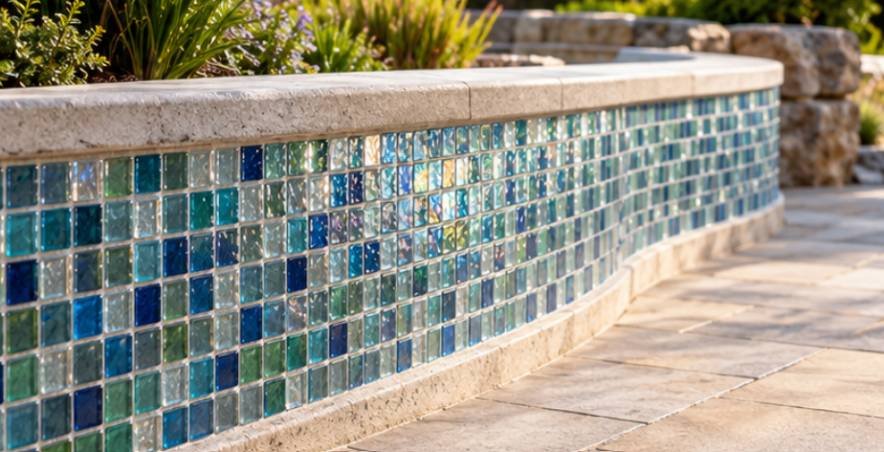
A perfectly cut mosaic can still fail if the exterior assembly traps water or cannot accommodate movement. Cornell’s garden-based mosaic guidance recommends exterior-grade adhesives and water- and frost-resistant cementitious materials for outdoor mosaics.
Outdoor mosaic installations also need regular maintenance to prevent moisture-related buildup; learn how to clean algae off shaded outdoor mosaic patio tiles without damaging grout or delicate tile surfaces.
More importantly, curved outdoor walls experience temperature-related movement just like flat walls.
The International Masonry Institute notes that tile assemblies need movement accommodation at appropriate locations, including changes in plane and other transitions. Exterior systems should therefore be designed rather than simply covered continuously with rigid grout and mortar.
Choose glass mosaics specifically approved by their manufacturer for exterior exposure. The mortar, grout, waterproofing or drainage system, and movement-joint materials must also be compatible with the glass and the expected climate. That becomes particularly important in regions experiencing freezing temperatures.
Mistakes That Create Chipped or Uneven Mosaics
Trying to force a complete sheet around too tight a radius is probably the easiest mistake to prevent. Divide the sheet before cutting glass.
Another problem is removing too much glass with one squeeze of the nippers. Small bites provide much more control.
For another outdoor mosaic project that involves shaping and arranging individual ceramic fragments, see how to create a broken ceramic tile mosaic stepping stone with carefully fitted pieces.
A third is finishing the entire wall before evaluating the spacing from normal viewing distance. Install a small test area first. Glass is reflective, so uneven joints that appear minor at arm’s length can become obvious under afternoon sunlight.
Also avoid treating grout as a structural repair. Large gaps, unsupported tile edges, or irregular substrate conditions should be corrected before grouting.
Frequently Asked Questions
1. Can I cut small glass mosaic tiles with regular tile nippers?
Glass-specific wheeled mosaic nippers are generally better. Their cutting wheels concentrate pressure more predictably and allow small, controlled adjustments instead of crushing the tile edge.
2. Do I need a wet saw for glass mosaics?
Not always. Nippers may handle small curved adjustments, while a glass-compatible diamond wet saw is useful for long, straight, repeatable, or especially clean cuts.
3. How do I make mosaics follow a very tight curved wall?
Divide mesh-mounted sheets into narrow strips or individual tesserae. Smaller sections articulate around the radius more naturally and help prevent excessively wide or compressed grout joints.
4. Can any glass mosaic be installed outdoors?
No. Confirm that the specific tile and installation materials are approved for exterior conditions, including the moisture exposure and freeze-thaw conditions expected at the project location.
Final Takeaway
The secret to a professional curved mosaic is not cutting every glass piece into a perfect arc. It is making each section small enough that the grout joints and individual tiles collectively follow the curve.
Once you understand how to cut small glass mosaic tiles for outdoor curved walls, work slowly: dry-fit first, divide sheets before unnecessarily cutting glass, use nippers for fine shaping, use diamond tools for precision cuts, smooth exposed edges, and protect the installation against exterior movement and moisture. A few extra minutes spent fitting each section can determine whether the finished curve looks intentionally crafted or visibly forced.